Thursday, 13 April 2017

delete virus - ourluckysites, deskapp , WINSNARE ,SNARER,Kyubey,MIO,startpageing123

I made a mistake to run a virus program so my laptop got virus. 

I have tried to clean all virus by myself without downloading any program. 

1. I remove application - deskapp and WINSNARE 

  1. Press Win+R and type Control Panel into the open box.
  2. Click OK and go to Uninstall a program.
  3. Highlight the application and click Uninstall.


2. Delete all virus folders. 

C:\Users\KennethHu\AppData\Roaming\
C:\Users\KennethHu\AppData\local\
C:\Windows\Temp


  C:\Users\KennethHu\AppData\Roaming\WINSNARE\WinSnare.dll
WinSAPSvc
WinSAP.dll
MIO.dll
Kyubey.exe
MIO.exe
....... 

3. Hold the Start Key and R –  copy + paste the following and click OK:
notepad %windir%/system32/Drivers/etc/hosts
A new file will open. If you are hacked, there will be a bunch of other IPs connected to you at the bottom. Look at the image below:
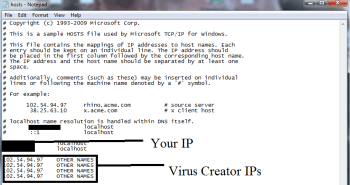
hosts_opt (1)

4. After you complete this step, the threat will be gone from your browsers. Finish the next step as well or it may reappear on a system reboot.
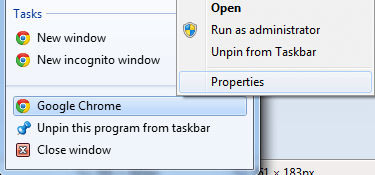
Right click on the browser’s shortcut —> Properties.
NOTE: We are showing Google Chrome, but you can do this for Firefox and IE (or Edge).
browser-hijacker-taskbar-propertiest

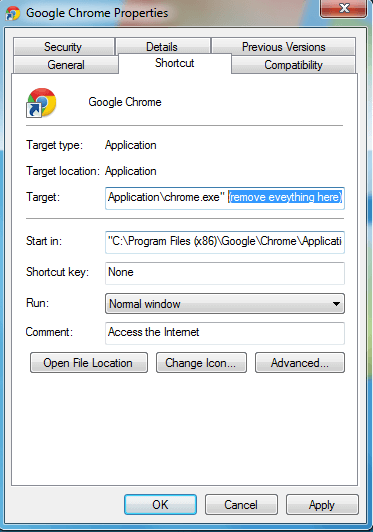
Properties —–> Shortcut. In Targetremove everything after .exe.
If u got virus, it will become 
"C:\ProgramFiles(x86)\Google\Chrome\Application\chrome.exe" http://www.ourluckysites.com/?type=sc&ts=1491368372&z=95570b72381db34651c485cg4z1t1g4c3q0b7cfqdo&from=che0812&uid=SanDiskXSD7SB2Q-512G-1006_153581400776
Correct it to "C:\Program Files (x86)\Google\Chrome\Application\chrome.exe" 
ie9-10_512x512  Remove WinSnare from Internet Explorer:
Open IE, click  IE GEAR —–> Manage Add-ons. remove wired search Providers.  please refer this - http://guides.uufix.com/guide-to-remove-startpageing123-com-completely/
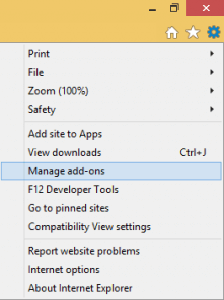
pic 3
My search providers after clean virus search provider.

Find the threat —> Disable. Go to IE GEAR —–> Internet Options —> change the URL to whatever you use (if hijacked) —> Apply.

firefox-512 Remove WinSnare from Firefox:

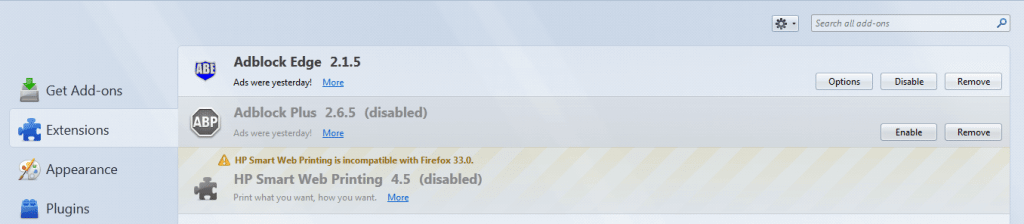
Open Firefoxclick  mozilla menu  ——-> Add-ons —-> Extensions.
pic 6

Find the adware/malware —> Remove.
chrome-logo-transparent-backgroundRemove WinSnare from Chrome:

Close Chrome. Navigate to:
 C:/Users/!!!!USER NAME!!!!/AppData/Local/Google/Chrome/User Data. There is a Folder called “Default” inside:
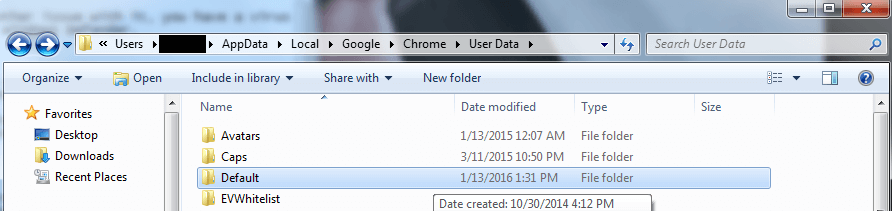
Rename the Folder to Backup Default
Rename it to Backup Default. Restart Chrome.
5. I delete all browsers- chrome , firefox and reinstall them again. 


6.At begin, I thought all virus was remove but it come up again at certain time. 
My case is around 545 P.M.  My Chrome will suddenly close and open again but homepage will redirect to ourluckysites site or other site.

I found out that virus register service in Service.exe and create task in task scheduler.  
1. stop service. 
2. delete folder where file is. 
3. delete service in cmd.exe -  SC Delete [service name]
4. delete task in task scheduler. 


Is it finish?  No, it still will come up and self-install above services and programes. 

I believe that the problem must in service.exe or task scheduler.

I open Powershell and execute  "Get-WmiObject win32_service | ?{$_.Name -like '*'} | select Name, DisplayName, State, PathNames"  -- refer to this http://stackoverflow.com/questions/24449113/how-can-i-extract-path-to-executable-of-all-services-with-powershell

2. find out a virus - FirefoxUpdate.exe  - At this time, I already remove firefox.  FirefoxUpdate.exe should be not in there. In addition, I cannot see this service in services panel. So I delete it and do above steps again.   
Please refer to this - https://trojan-killer.net/firefoxupdate-exe-uvconverter-exe-adware-remove/


Until now, I did not see virus again. I hope I really remove all virus from my laptop. 

Sunday, 9 April 2017

How to fix taskbar search not working in Windows 10

How do I fix my taskbar search in Windows 10?
Once in awhile, Windows 10 decides it doesn't want to search from the taskbar anymore. Why? Detective work is hard work.There are several solutions to this problem but the best idea is to restart Windows Explorer.  

開機使用一段時間後,Windows 10 的 search bar 會無法搜尋。為什麼?也許是搜尋工作是艱苦,Search bar 罷工了。這個問題有幾種解決方案,但最好的辦法是重新啟動Windows資源管理器。我們來看看我們是否無法修復Windows 10中的任務欄搜索。
        

Restart Windows Explorer  重新啟動Windows資源管理器

Another quick fix attempt, restarting Windows Explorer might jump-start the taskbar search into working again.
重新啟動Windows資源管理器可能會啟動任務欄搜索再次工作。

  1. Right-click the Start button.
  2. Click Task Manager.
    Right-click the Start button. Click Task Manager.
  3. Click Windows Explorer. It's located near the bottom of the Task Manager menu.
  4. Click End task.
    Click Windows Explorer. Click Restart.
  5. When Windows Explorer is disappeared, Click Run new Task under File menu.


  6. Open: C:\Windows\explorer.exe
  7. Click: OK
  8. After Windows Explorer restart, Search bar will work.
  9. Read on if you still can't search from your Windows 10 taskbar. 


Friday, 7 April 2017

[Selenium] 4 Selenium Google WebDriver.

In this section,  You will learn how execute test case by Chrome browser and execute browser behavior by selenium.

1.  Execute test case by Chrome
1.1.Create a [BrowersDriver] folder under Python36 folder.
1.2.Download Goolge WebDriver and save into BrowersDriver folder - link1  link2 
   (P.S : You can save it  wherever you want. )


1.3. Create testChrome.py file in pyCharm IDE.

1.4. Entering the below code and execute it.


        from selenium import webdriver

        url="C:\\Programs\\Python36\\BrowersDriver\\chromedriver.exe"        driver=webdriver.Chrome(url)

        driver.get("http://www.google.com")

        # print current url        print(driver.current_url)
        # print current page title        print(driver.title)

        # Close the browser window that the driver has focus of        driver.close()
        # Call Dispose() => Release all resource.        driver.quit()


       In this test case,
          1. go to Google Website
          2. print current URL - https://www.google.com.sg/?gfe_rd=cr&ei=FlbnWJ2QIrHG8AfLz7zQDg&gws_rd=ssl
          3. print current webpage title - Google
          4. close the browser
          5. release webdriver. 


PS: If your chrome just shows blank page, WebDriver you download does not support your Chrome. 
Solution: download Chrome WebDriver which match your chrome version or 
          downgrade your chrome version. 

My Chrome Version: 57.02987.133 (64 bit)
ChromeDriver.exe version is blank. 

2. Browser Behavior 
    You will learn how to manipulate browser behavior - Go, back, forward, refresh.
2.1 Create a python file - TestDriverBehavior.py
2.2 Entering the below code and execute it.
   
    
print
(driver.current_url) # print current page titleprint(driver.title) # go to Yahoo pagedriver.get("http://www.yahoo.com") # print current urlprint(driver.current_url) # print current page titleprint(driver.title) # go back previous pagedriver.back() # print current urlprint(driver.current_url) # print current page titleprint(driver.title) # loads the next URL in the history list as same as window.history.forward() method.driver.forward() # print current urlprint(driver.current_url) # print current page titleprint(driver.title) # refresh current pagedriver.refresh() # Close the browser window that the driver has focus ofdriver.close() # Call Dispose() => Release all resource.driver.quit()


       In this test case,
          1. go to Google Website
          2. print current URL - https://www.google.com.sg/?gfe_rd=cr&ei=FlbnWJ2QIrHG8AfLz7zQDg&gws_rd=ssl
          3. print current webpage title - Google
          5. go to Yahoo website
          6. print current URL - https://sg.yahoo.com/?p=us
          7. print current webpage title -Yahoo
          8. go back privous web page (Google)
          9. print current URL - https://www.google.com.sg/?gfe_rd=cr&ei=FlbnWJ2QIrHG8AfLz7zQDg&gws_rd=ssl
          10. print current webpage title - Google
          11. go forward to next web page (Yahoo)
          12. print current URL - - https://sg.yahoo.com/?p=us
               13. print current webpage title - Yahoo
          14. refresh current page
          15. close the browser
          16. release webdriver. 
You can download my code on my github 

[Selenium] What's WebDriver

 What's WebDriver

The primary new feature in Selenium 2.0 is the integration of the WebDriver API. WebDriver is designed to provide a simpler, more concise programming interface in addition to addressing some limitations in the Selenium-RC API. Selenium-WebDriver was developed to better support dynamic web pages where elements of a page may change without the page itself being reloaded. WebDriver’s goal is to supply a well-designed object-oriented API that provides improved support for modern advanced web-app testing problems.


Selenium 2.0的主要新功能是WebDriver API的集成。除了解決Selenium-RC API中的一些限制之外,WebDriver旨在提供更簡單,更簡潔的編程接口。 Selenium-WebDriver被開發以更好地支持動態網頁,其中頁面的元素可能改變而不重新加載頁面本身。 WebDriver的目標是提供一個精心設計的面向對象API,為現代高級Web應用程序測試問題提供了更好的支持。


Selenium 1.0 + WebDriver = Selenium 2.0


You must download WebDriver for different Browser. 

您必須下載不同瀏覽器的WebDriver

Download link :  http://www.seleniumhq.org/download/


Tuesday, 4 April 2017

Debugging NodeJs application in windows


Basic debugging

1. execute cmd.exe or open command line
2, type  "node debug [path]/[file name].js". you can see that as below.


3. type "n", it will go to next step.


4. type "c". It will continue to run the rest code without stop. 

5. type "quit". it will leave debug. 


Advance debug
1.  How to watch on break point. 
     1.1 type  "node debug [path]/debuugering.js".
     1.2 type "n"
     1.3 type "n"
     1.4 type "repl"
     1.5 type "console.log(person.age)"
  You can see the value of current person.age. 


2. Set up a break point in js file. 
    2.1 open debugging.js file 
    2.2 type "debugger"
    2.3 save the file
    2.4 go back to command line. 
    2.5 type  "node debug [path]/debuugering.js".
    2.6 type "c"
    2.7 it will run until break point. 


Monday, 3 April 2017

[Selenium] 2. install IDE - pyCharm

寫Code就要用IDE,這是我第一次接觸python ,目前就選擇的pyCharm,據說是最好的IDE,目前使用還不錯。 如果你沒有偏好的IDE,那先跟我一起使用pyCharm Community Edition。

pyCharm 有付費版本跟免費版本, 而pyCharm Community Edition 是免費版的。

下載點 : https://www.jetbrains.com/pycharm/download/#section=windows

Double-click pycharm-community-yyyy.m.exe file to launch the installer. You computer verifies it, and then opens the first page of the installation wizard:

雙擊pycharm-community-yyyy.m.exe文件以啟動安裝程序:


Click Next
點擊Next (下一步)

On the second page of the wizard, you have to specify whether you wish a previous installation to be uninstalled, and, moreover, silently:

在第二步,您必須指定是否希望卸載先前的安裝:


Click Next 

點擊Next (下一步)

3. On the Choose Install Location screen, specify the destination directory where the product will be installed. The installation wizard suggests a default location. To choose a custom location, click Browse and select the desired location in your file system. When ready, click Next.

3.在“Choose Install Location (選擇安裝位置)”屏幕上,指定要安裝的目標目錄。建議默認位置。如果要選擇自定義位置,請單擊瀏覽並在文件系統中選擇所需的位置。準備好後,單擊下一步。


4. On the Installation Options screen, specify the following options:

4.在“Installation Options(安裝選項)”上,指定以下要安裝的選項:


  • Create Desktop shortcut: if you select this check box, the shortcut to PyCharm Edu will appear on your Desktop. Thus you will be able to launch PyCharm Edu from your Desktop, by double-clicking this shortcut icon. If you leave this check-box unselected (this is what the installer suggests), then the shortcut on the Desktop will not be created, and you will have to launch the application from the Start menu or from your file system only.
  • 創建桌面快捷方式:如果選中此Checkbox(復選框),PyCharm Edu的快捷方式將顯示在桌面上。因此,您可以通過雙擊此快捷方式圖標從桌面啟動PyCharm Edu。如果您未選擇此復選框(這是安裝程序建議),則桌面上的快捷方式將不會被創建,您將不得不從“開始”菜單或僅從您的文件系統啟動該應用程序。

  • If you are working on Windows XP, you can opt to select the check-box Create Quick Launch shortcut.
  • 如果您使用的是Windows XP,則可以選擇“創建快速啟動”快捷方式。
  • Choose Python version: in this section, you have to specify which Python version will be installed for PyCharm Edu. The installer suggests you to choose between Python 2.7 and Python 3.5 (which is pre-installed). If you are not sure which version suits you better, refer to the comparison of versions.
  • 選擇Python版本:您必須指定為PyCharm Edu安裝哪個Python版本。安裝程序建議您選擇Python 2.7和Python 3.5(預先安裝)。如果您不確定哪個版本適合您,請參閱版本的比較。我的課程請安裝Python 3.x版


5. On this page of the installation wizard, you have to specify in which folder of the Start menu the application shortcuts will appear. If you do not enter the folder name, then your Start menu will contain the folder JetBrains.
此頁面上,您必須指定開始菜單的哪個文件夾將顯示應用程序快捷方式。如果您沒有輸入文件夾名稱,則“開始”菜單將包含JetBrains文件夾。

Click Install.
單擊Install (安裝)。


See how the installation works:

看安裝的進度:


6.When the installation is ready, you see the last page of the wizard:
6.安裝準備就緒後,您將看到最後一頁:


Select the checkbox Run PyCharm Community Edition (if you want to launch the product immediately), and click Finish.
選中運行PyCharm Community Edition(如果要立即啟動產品)複選框,然後單擊Finish完成。


If you have had a previous install of PyCharm you can import your previous settings.

如果您以前安裝了PyCharm,您可以導入以前的設置。

PyCharm gives you the option to use a selection of themes, this is down to personal preference, but for those that are planning long coding sessions, Darcula is always easier on the eyes.

PyCharm可以讓您選擇使用主題,這取決於個人喜好,但對於那些長時間編碼的人來說,Darcula是對眼睛比較好的。


Now PyCharm is installed we’re ready to create our first project

現在,PyCharm已經安裝好,我們可以來創建我們的第一個項目


Change the name in the location textbox to HelloWorld and click "Create"

將位置文本框中的名稱更改為HelloWorld,然後單擊“Create

Now that our project has been created we need a Python file in which we can write code. Select File from the menu then New.

現在我們的項目已經創建,我們需要一個Python文件,我們可以在其中編寫代碼。從菜單中選擇 File (文件) ,然後選擇New...(新建)。


Select Python File from the available options
從選項中選擇Python文件

Finally we need to select a name for our Python file, just use Hello
最後,我們需要為我們的Python文件選擇一個名稱,使用Hello

At last we’re ready to write our first Python program and it’s a very simple one.
最後,我們準備編寫我們的第一個Python程序,這是一個非常簡單的程序。

In the new tab that has been opened type print(“hello world”)
在新的頁面,輸入 print(“hello world”)

You will notice that whilst typing print you will see a pop up displaying information about the method, and PyCharm will automatically add the closing bracket, how thoughtful!

你會注意到在敲打時你會看到一個彈出來顯示關於該方法的信息,PyCharm會自動添加關閉括號,設想非常周到!


Now all that’s left to do is run the program, you can do this by selecting run -> run hello from the menu bar, to pressing shift F10.

現在剩下要做的就是運行程序,你可以通過從菜單欄中選擇run  - > run hello,按shift F10來執行。


Note an output windows has appeared at the bottom of the application containing the below text:

注意,輸出窗口出現在包含以下文本的應用程序底部:路徑會依個人安裝和項目的路徑而不同

C:\Programs\Python36\python.exe C:/Kenneth/Projects/Selenium/HelloWorld/HelloWorld.py

hello world

Process finished with exit code 0

So, what does this mean? Well C:\Programs\Python36\python.exe is the executable of the Python interpreter on your PC.

這是什麼意思? C:\ Programs \ Python36 \ python.exe是您的PC上的Python解釋器的可執行文件。

C:/Users/kenneth/PycharmProjects/HelloWorld/Hello.py is the file we have created that has been executed, note the file name HelloWorld.py inside of the HelloWorld project

C:/Users/kenneth/PycharmProjects/HelloWorld/Hello.py是我們已經執行的文件,請注意HelloWorld項目中的文件名HelloWorld.py

hello world  Is the output from the program we have just ran.
hello world 是我們剛剛運行的程序的輸出。

And Process finished with exit code 0 just lets us know that the program ran without any errors.

而Process finished with exit code 0只是讓我們知道程序運行沒有任何錯誤。

You can refer to HellWorld.py on my GitHub.

Congratulations you have written your first Python program!

Leave a comment if you have any questions and follow on the Python programming series as we move onto more advanced and much more interesting areas of the Python language


Sunday, 2 April 2017

高鐵 WiFi 來了!教你用免費帳號上網

行政院表示,解決民眾長久以來的抱怨,行政院科技會報辦公室將推動「公共區域及大眾運輸 iTaiwan 無線上網躍升計畫」,只要有一個 iTaiwan 帳號,7 月以後高鐵全線免費上網。

行政院也說,除了高鐵之外,目前政府分 3 個時程推動這項計畫,一是在 5 月底前,各機場、台鐵車站及月台,都可以建置完成;二是 7 月底前,大部分公共場域都可以建置完成;三是 10 月底前,各地遊客中心及各地方政府的圖書館都會完成建置。

如何申請 iTaiwan

上 iTaiwan 網頁提供手機號碼,系統即會透過手機簡訊傳送認證碼,再輸入認證碼及自行設定密碼後,即可隨時在指定「熱點」區域無線上網。 帳號申請點此去
▲民眾只要有 iTaiwan 帳號,7 月後可在高鐵全線免費上網。 聯合報系資料照

how-to-recursively-create-subfolder-in-each-folder-of-a-directory-in-cmd

test.cmd: @echo off setlocal for /f "usebackq tokens=*" %%a in (`dir /b /a:d`) do ( rem enter the directory pushd %%a echo...