Tuesday 27 June 2017

How to create/clone/push a github repository


1. Open "https://github.com/"

2. login

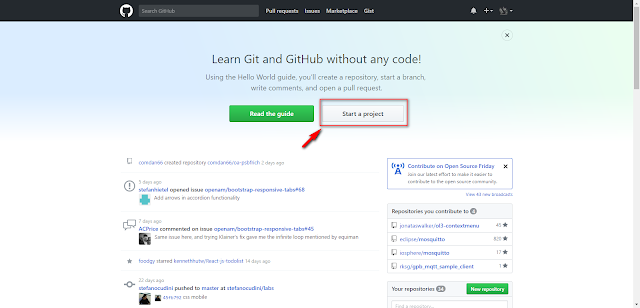
3. Click "Start a project"
    點擊 "Start a project"


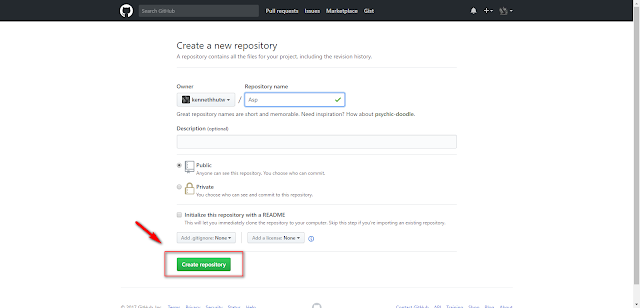
4. name your repository and click "Create repository"
    填上你的repository 名稱然後點擊 "Create repository"
5. It redirect to your repository  as below image
    5.1 Click "Clone or download"  點擊 "Clone or download"
    5.2 Copy "HTTPS"'s the web URL 複製 "HTTPS"的Web URL
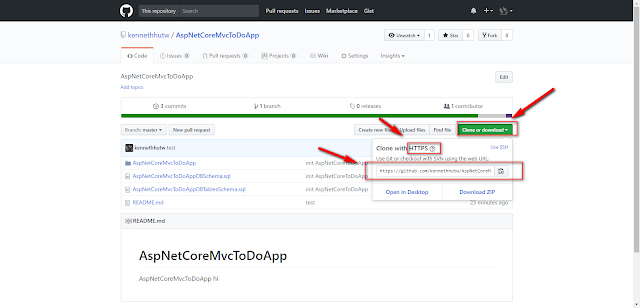
  example :https://github.com/kennethhutw/AspNetCoreMvcToDoApp.git
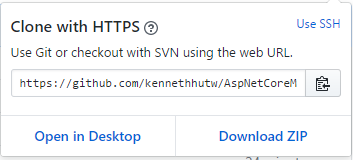
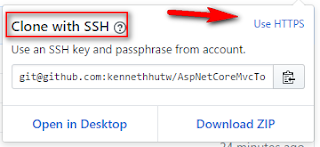
    PS: if it is not HTTPS, please click "Use HTTPS" 如果不是HTTPS ,請點擊旁邊的 "Use HTTPS" 如圖下

6. open your command line on windows 打開你的"命令行"

    Type git clone, and then paste the URL you copied in Step 5.
git clone https://github.com/YOUR-USERNAME/YOUR-REPOSITORY

7. Press Enter. Your local clone will be created.  按"Enter" 會複製與建立本地repository 
git clone https://github.com/YOUR-USERNAME/YOUR-REPOSITORY
Cloning into `Spoon-Knife`...
remote: Counting objects: 10, done.
remote: Compressing objects: 100% (8/8), done.
remove: Total 10 (delta 1), reused 10 (delta 1)
Unpacking objects: 100% (10/10), done.

reference URL - https://help.github.com/articles/cloning-a-repository/

8. The repository folder is created on your path.
    repository 資料夾會建立在你的路徑上
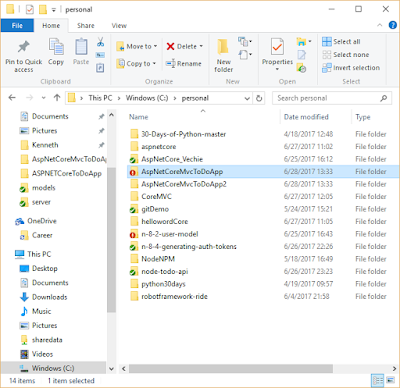

9.    Type cd YOUR-REPOSITORY, and Type git status  check your repository
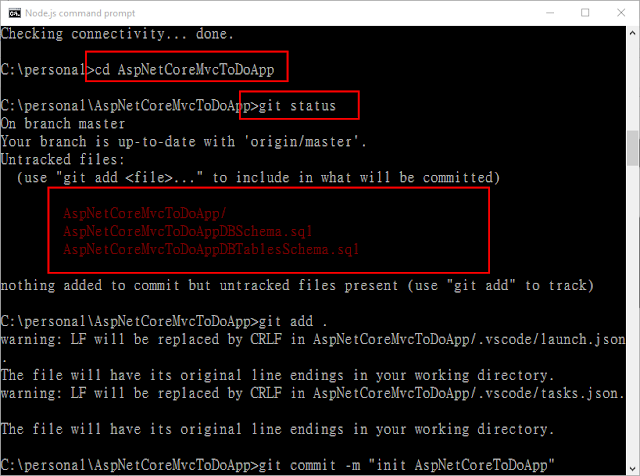

10.   Add the files in your new local repository. This stages them for the first commit.
  1. git add .
    # Adds the files in the local repository and stages them for commit. To unstage a file, use 'git reset HEAD YOUR-FILE'.

11. Commit the files that you've staged in your local repository.
git commit -m "First commit"
# Commits the tracked changes and prepares them to be pushed to a remote repository. To remove this commit and modify the file, use 'git reset --soft HEAD~1' and commit and add the file again.
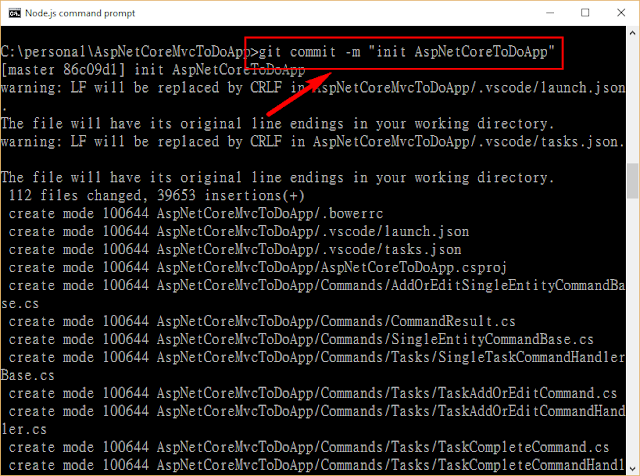
12   Type Git remote -v ,  check your remote. If it does not exist, please add a remote
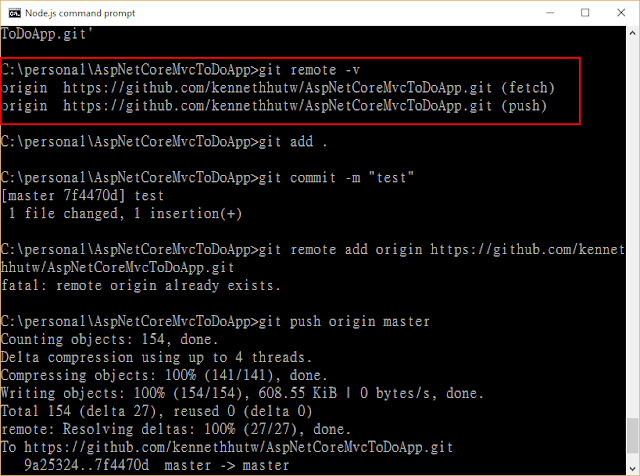

For example:
git remote add origin https://github.com/user/repo.git
# Set a new remote

git remote -v
# Verify new remote
origin  https://github.com/user/repo.git (fetch)
origin  https://github.com/user/repo.git (push)

13. Push the changes in your local repository to GitHub.
git push origin master
# Pushes the changes in your local repository up to the remote repository you specified as the origin


Sunday 25 June 2017

ASP.NET Core learning note

Check  asp.net core.

-- dotnet

init a new project

-- dotnet new

-- dotnet restore


run your own project

-- dotnet run


ASP.NET Core 附帶兩個不同的 HTTP 服務器:

Microsoft.AspNetCore.Server.Kestrel (AKA Kestrel,跨平台)
Microsoft.AspNetCore.Server.WebListener (AKA WebListener,僅 Windows,預覽版)
ASP.NET Core 不直接監聽請求,而是依靠 HTTP 服務器的實現將請求作為組成 HttpContext 的一組功能接口暴露給應用程序。盡管 WebListener 只是 Window 專用的,但 Kestrel 則是被設計為跨平台運行的。你可以通過在 project.json 文件中指定命令來配置你的應用程序承載於任何一個或全部的服務器。你甚至可以為應用程序指定程序入口點,作為一個可執行文件運行(使用 dotnet run),而不是承載到不同的進程。


Friday 16 June 2017

[2017.6.16專案&專案文化]

[2017.6.16專案&專案文化]
上週到這周工作都在修正bugs和優化,要說到與測試合作,談到測試就先提出一個迷思,西方的開發方式跟東方開發方式是不同的,主要是因為是文化的不同。
因為不同所以都溝通上就不同了,這是定位,了解自己團隊的文化與團隊的成員角色。
在西方文化上,基本上測試的角色會高於開發者,並且會有能力寫測試程式來測試,但是在東方是不同的,大多擔任測試工程師的是不會寫code,只是做UI的測試與驗證,大部分都不會寫code,如果真的學習西方開發團隊,企業主管大多是不同意的,原因一個原因是"$$$$"另一個原因是開發者很少能達到能寫測試程式的,而東方企業有測試團隊就算是不錯了。(唉!! 還真是容易滿足啊)
在這樣前提下,對開發者來說對測試工程師溝通就有主導權了,目前的專案sourcecode control 是用Git ,專案管理是用redme,回報bugs是在redme上,但是有點奇怪的是開發者卻沒有閱讀過測試案例,就直接開發了,雖然我們有User Case Spec。 測試案例是基於User Case Spec上撰寫,基本上功能要求上是一致的。 However, 在這專案卻很多差異與落差,我的bugs list 非常長而且很多是User Case Spec沒有寫的細節與功能要求,沒有implement當然會錯而且浪費了測試工程師的時間去測試,跟他們要test case還不願意給我看。
面對這樣的情況,我就告訴測試工程師一切問題都回報到Redme上吧! 我會一個個看與修正,然後在與測試工程師討論內容確認需求。 另一方面,leader 做了deployment 後,我自己會現做驗證確認無誤後才assign回去,如果沒有測試工程師就不用浪費時間去測。
以上就是在這個專案,我個人對測試工程師的溝通與合作方式,但是其他公司會有以不同的團隊方式與運作方式。
最值得討論就是開發工程師與測試工程師是應該平行還是上下關係呢? 各自該由一個主管帶還是有各自的主管帶領呢?
以前我有帶過測試團隊與開發團隊,是遠端合作的,研發中心分兩個,各自也有測試團隊,總公司在台北。
當研發中心開發新功能或是hotfix 時,台北這邊要做一次測試,才能發佈至客戶端。 在研發中心1,就是由開發主管帶著開發團隊與測試團隊,兩個研發中心是歸我管的 ^^。 在研發中心1這個開發主管A就認為開發者只要開發好就可以給測試去測,開發者不用測太仔細 (這是不對!! 不要學喔)。
這樣觀念下,如果開發者很有責任感就還好,可是偏偏就有個沒有責任感的開發者,隨便改隨便測就交付給測試工程師測試改好一個錯另一個,有次最高紀錄是這樣來來回回高達50多次,測試工程師很生氣但是對這位開發者沒辦法,因為主管挺他。 別以為每一位合作的人都很好,等合作後才能下判斷。 後來我是直接把這位開發者開除了,而且不給開發主管面子。(辦公室政治之一)
只要有人就有江湖,有江湖就要了解情況懂得權謀! 現在的我只是單單純純的當個開發工程師了
你們呢? 你們有測試團隊嗎? 團隊合作是如何呢? 期待其他人的分享了!!
No automatic alt text available.

No automatic alt text available.

Sunday 4 June 2017

Getting Started with RobotFramework on Windows

http://www.lyyyuna.com/2016/04/09/robotframework-tutorial-a-complete-example/


Robot Framework 是一個通用的自動化測試框架。

Robot Framework 自身和其核心庫都是由 Python 實現的。因此,如果熟悉 Python (或者打算開始熟悉 :)),用其寫自己的關鍵字是個好的選擇。


Getting Started with RobotFramework on Windows

Install python

1) Go to https://www.python.org/ and download Python 2.7.x version as shown below and install it.


2) Open command prompt and run below command.


3) encounter error when installing robotframework

   3.1)  I have installed  python36 and python27 on my PC so it show the below error           
             NameError: name 'execfile' is not defined. 
           Solution :  Go to python27 folder and use the below command to install robotframework. 


  3.2) When run ride.py, it said "wxPython not found."

         solution :  install wxPython 2.8.12.1  download from https://sourceforge.net/projects/wxpython/files/wxPython/2.8.12.1/  

     3.2)  download  "robotframework-ride-1.5.2.1.win-amd64.exe" but it said "No python installation found in the register"

            solution : install robotframework by Pip 
        

4)  after solve the above issue, continue to run below command. 


How to us
e Robot Framework with Selenium2Library & RIDE & Command Prompt

First, open cmd prompt and write “ride.py” and then press Enter. Then, you will see RIDE editor.  


Saturday 3 June 2017

JSON SERVER


Serverr : https://github.com/typicode/json-server


1. Install package.

   -  npm install -g json-server

2. start service

   - json-serevr -- watch db.json

     * after run instruction, it will generate a json database : db.json


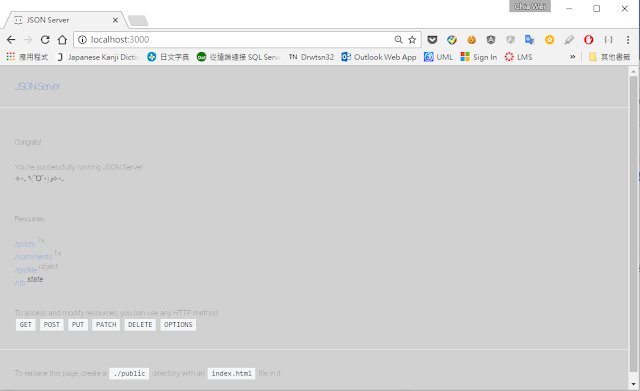
3. open browser and type - localhost:3000


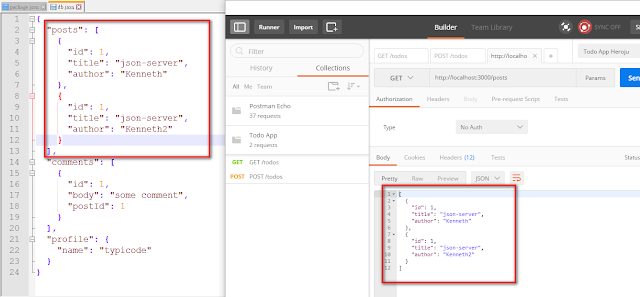
4. try to get posts resource by postman.


JSON-SERVER support HTTP operation method

  •    GET
  •    DELETE
  •    POST
  •    PUT
  •    PATCH


Features


{
  "todos": [
    {
      "id": 1, 
      "todo": "study json-server", 
      "complete":"true"
    },
    {
       "id": 2, 
      "todo": "study frontend", 
      "complete":"false"
    },
    {
       "id": 3, 
      "todo": "PMP", 
      "complete":"true"
    },
    {
       "id": 4, 
      "todo": "MBA", 
      "complete":"false"
    }
  ]
}


You can download my db.json from my github - https://github.com/kennethhutw/json-server


1. ID
We need to post this data without specifying an ID in the URI, but add it in the data. To check if this was successfully added, send a GET request to the server:

http://localhost:3000/todos/2


 2. Search
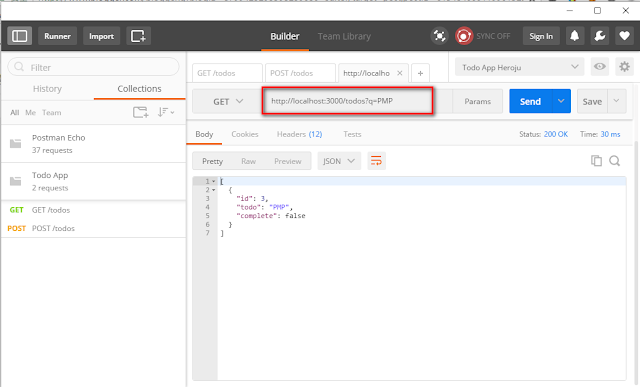
You can search within a resource for relevant results. For example, in the todos API, if you want to search for the word "PMP", then you need to add an optional parameter q to your URI:

http://localhost:3000/todos?q=PMP


3. Filters
You can apply filters to your requests again using the ? sign. The q filter is reserved for search as we've seen above.

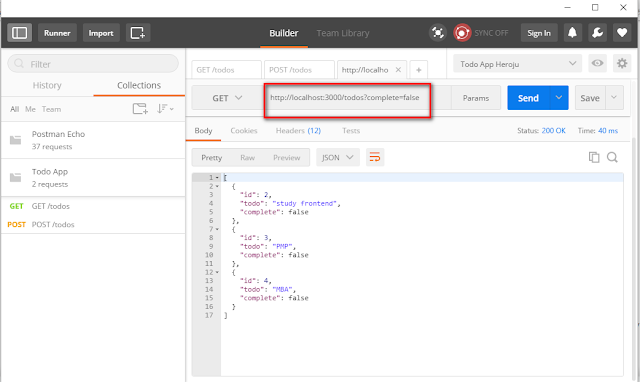
If you want to get the uncompleted list, you can send a GET request to your resource URI appending it with a ? followed by the property complete you want to filter with and its value:


http://localhost:3000/todos?complete=false


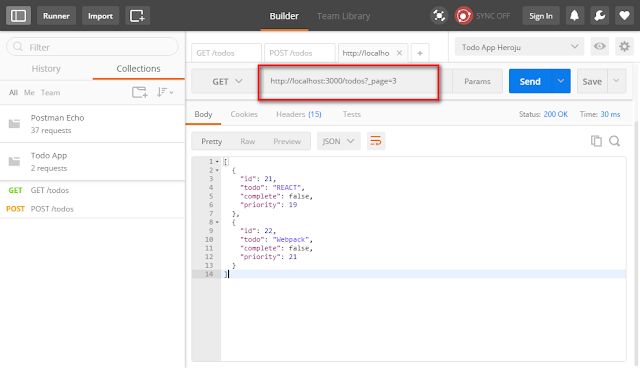
4. Pagination
json-server, by default, provides pagination support with 10 items per page. Pagination comes in handy when prototyping apps that'll have pages or will load data when scrolling.

For example, if you want to access page 3 of your todos's API, send a GET request:value:


http://localhost:3000/todos?_page=3


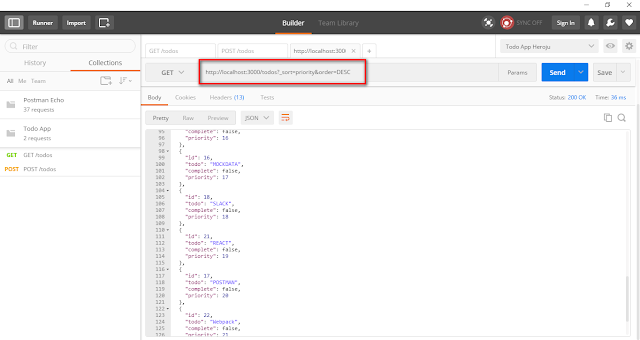
5. Sorting
It also allows you to request sorted data from your API. Use the _sort and _order properties for specifying the property on whose basis you want to sort and the order in which you want to sort it respectively. If you are sorting on a text field, the entries would be sorted alphabetically.

For example, if you want the list of todos to be sorted in descending order of ratings, then you'll send a GET request:


http://localhost:3000/todos?_sort=priority&order=DESC


how-to-recursively-create-subfolder-in-each-folder-of-a-directory-in-cmd

test.cmd: @echo off setlocal for /f "usebackq tokens=*" %%a in (`dir /b /a:d`) do ( rem enter the directory pushd %%a echo...